
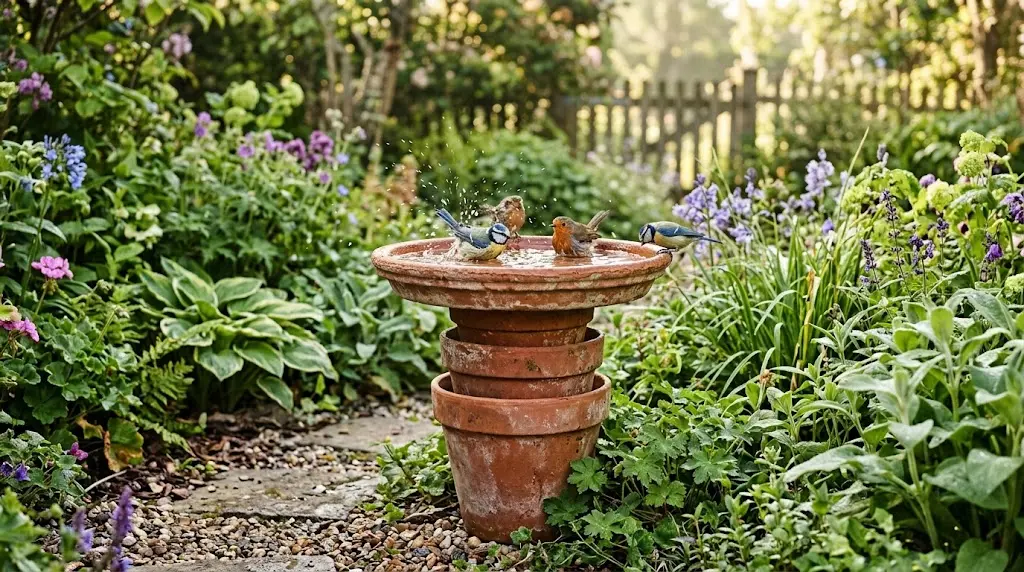
To make a DIY bird bath from terracotta pots, stack two pots upside down, glue them together with waterproof adhesive, and set a sealed terracotta saucer on top. Fill it with one to two inches of fresh water. Place it in an open, shaded spot and clean it every few days.
Last spring, I watched a single sparrow hop around my yard, looking for water. The nearest pond was two streets away. That moment pushed me to start building a bird bath that same afternoon, using three terracotta pieces from a garden center and a tube of glue. The hands-on work took about an hour, cost around $30, and brought birds to my yard within a week.
You can do the same. A terracotta bird bath is one of the easiest garden crafts out there, and you don’t need special tools or skills. This guide walks you through every step, from picking pots to keeping the water clean. Read it once, grab your supplies, and you will have a working bird bath by the end of the weekend.
Why Terracotta Makes a Great Bird Bath

Terracotta is fired clay, and people have shaped it into pots for thousands of years. It looks warm and natural, so it fits into almost any yard. Birds like it too. The slightly rough surface gives their feet a good grip while they drink and splash. Smooth plastic and glazed ceramic can feel slippery, and birds avoid surfaces where they can’t stand steady.
Terracotta is also cheap and easy to find. Hardware stores, garden centers, and discount shops all carry pots and saucers. A large saucer usually costs $8 to $15, and pots cost about the same. The pieces stack neatly, so you can build a bath at almost any height.
There is one catch. Raw terracotta is porous, so it soaks up water and lets some of it seep out. You will fix that by sealing the saucer, and the process takes only a few minutes of work.
Supplies You Need for a Terracotta Bird Bath
Gather everything before you start, so you don’t have to stop halfway. You need two terracotta pots and one large saucer. A 12-inch pot works well for the base, and an 8-inch pot fits on top of it. Choose a saucer that is 12 to 14 inches wide. That size gives birds room to bathe and still sits securely on the stack.
You also need a waterproof sealer that is safe for wildlife. Look for a clear, water-based, non-toxic product, and read the label to confirm it is safe once cured. Outdoor adhesive holds the pieces together, so pick a waterproof glue such as E6000 or a silicone-based outdoor adhesive. A small paintbrush, fine sandpaper, and a damp cloth complete the tool list.
If you want color, buy outdoor acrylic paint, and use it on the outside of the pots only. Finally, grab a few flat river stones. Those stones give small birds a safe place to stand in the water. Most people spend $25 to $45 on the full set of supplies.
How to Choose the Right Pots and Saucer
Check each piece in the store before you buy it. Run your fingers over the surface and look for cracks or chips. Tap the pot gently with a knuckle. A clear ring means the clay is sound, while a dull thud can point to a hidden crack.
Next, think about how the pots fit together. The rim of the top pot rests on the flat bottom of the pot below it. So the rim above should be no wider than the flat bottom beneath it. If the store allows it, stack the pieces on the shelf to test the fit.
Pay attention to the saucer’s shape, too. Birds like shallow edges and a slightly deeper middle, so pick a saucer with gently sloped sides. Water should reach no deeper than two inches at the center. A saucer with steep walls forces small birds to wade into deep water, and most of them won’t try it.
Seal the Saucer Before You Build
Sealing is the step most people skip, and it matters a lot. Unsealed terracotta soaks up water, so the saucer looks damp, seeps water, and empties fast. In cold areas, water trapped inside the clay can freeze and crack it. A good sealer stops both problems.
Brush a thin, even coat of sealer over the inside of the saucer and about an inch up the outer edge. Let it dry, then add a second coat. Leave the bottom of the saucer bare, because bare clay gives the glue a better grip later. Many sealers need one to three days to cure fully, so check the label.
After the sealer cures, rinse the saucer, fill it with water, and let it sit for a full day. Dump the water and rinse once more. This removes leftover dust and any smell before birds arrive. Choose a matte or satin finish, since glossy sealers can turn slick when wet.
Step-by-Step Instructions to Build Your Bird Bath
Start by wiping both pots with a damp cloth to remove dust. Let them dry in the sun for about 30 minutes. If you feel any sharp or rough spots on the rims, sand them lightly.
Next, choose the final spot and build the bath right there. Once the glue sets, the stack gets heavy and awkward to move. Flip the large pot upside down so its wide rim rests on the ground and the flat bottom faces up. Check that the ground is level. A flat paver under the rim can fix a slight tilt.
Now add the adhesive. Spread a bead of glue around the flat bottom of the large pot, about an inch from the edge. Flip the smaller pot upside down and press it onto the glue, centering it carefully. Wipe away any squeezed-out glue with a damp cloth right away. Keep glue out of the basin, since birds will drink there.
Repeat on top of the small pot, then press the saucer into place with the sealed side facing up. Step back and look at the stack from several sides. If it leans, nudge it now, before the glue sets. Let everything cure for 24 hours, and don’t fill it during that time. Check the adhesive label, since some brands need up to 72 hours.
When the glue is fully cured, give the stack a gentle push. If it wobbles, add more glue and wait again. Then fill the saucer with one to two inches of clean water. Rest two or three flat stones in the water so the tops peek above the surface. Small birds use them as stepping spots and can drink without getting soaked.
Paint and Decorate the Outside
Once the glue cures, you can add color to the outside of the pots. Use outdoor acrylic paint and apply two thin coats instead of one thick coat. Stay away from the inside of the saucer and its rim, because birds drink there and paint can flake into the water. Soft greens, blues, and warm yellows look great in most gardens.
You can also stencil leaves, sponge on a simple pattern, or glue on a strip of small tiles. Leave the bare terracotta if you prefer a natural look. Over time, the clay picks up a soft, weathered tone that many gardeners love.
Where to Place Your Bird Bath
Location matters as much as construction. Wet feathers make flying harder, so birds feel exposed while they bathe. Choose an open spot, about ten feet from dense shrubs where cats can hide. Keep a tree or tall bush within a short flight, so birds can dart to cover after a splash.
Partial shade keeps the water cooler in summer and slows algae growth. Pick a place you can see from a window, too. Watching a chickadee splash around makes the project worth it.
Keep the Water Fresh and Clean
Fresh water keeps birds healthy and mosquitoes away. Mosquitoes need about a week to grow from eggs into adults, so changing the water every day or two breaks that cycle. On hot days, check the level often, since water evaporates fast.
Scrub the saucer once a week with a stiff brush and a mix of one part white vinegar to nine parts water. Rinse it well before you refill. Skip soap, because leftover residue can harm feathers. Never add dyes, chemicals, or antifreeze to the water.
Birds also love moving water. A small solar bubbler floating in the saucer adds gentle ripples and catches their attention from far away. Choose a model with a low-flow setting so the saucer doesn’t splash dry.
Summer and Winter Care
In summer, refill the saucer every morning and check for algae, since warm water grows it fast. In winter, terracotta needs extra care. Even sealed clay can crack when ice expands inside it.
If your area gets hard freezes, empty the saucer and cover it with a plastic lid or a board so snow and rain stay out until spring. Never pour hot water onto ice, because the sudden change can crack the clay.
Your Backyard Is Ready for Visitors
A terracotta bird bath takes little money, little time, and very little skill. You spend about an hour building it, a few days waiting on the sealer and glue, and a few minutes a week keeping it clean. Birds may take a few days or even a couple of weeks to trust a new bath, so give them time. Once the first sparrow lands and starts to splash, you will be glad you picked up those pots.

Comments are closed.