
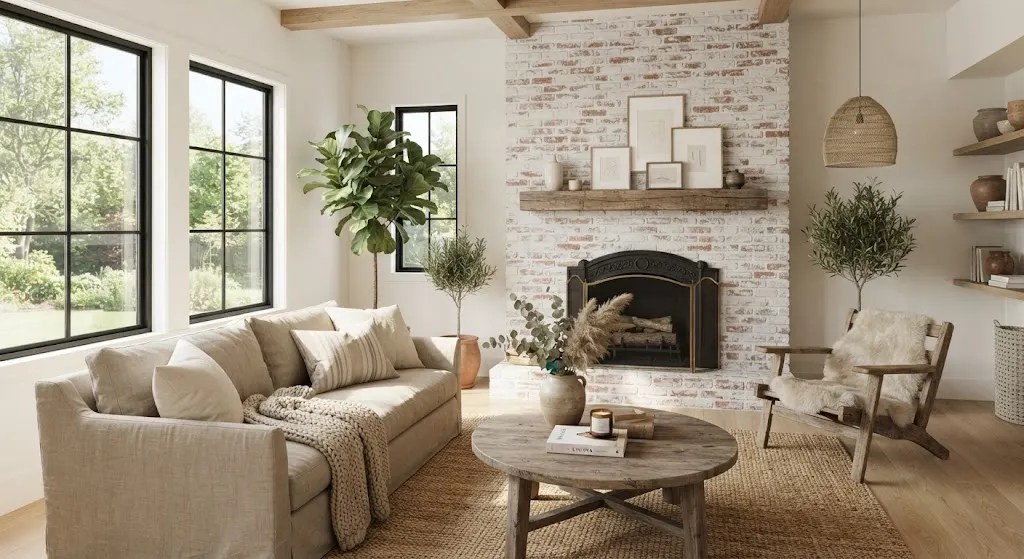
Whitewashed brick is a technique where diluted white paint is brushed onto brick, then partly wiped away so the natural texture and color still show through. It softens dark or dated brick without hiding it completely, unlike solid paint. Homeowners use it on fireplaces, exterior walls, and interior accent walls for a lighter, updated look.
Walk through any home renovation show or scroll through Pinterest for five minutes, and you’ll spot it. A dark, heavy brick fireplace turned into something soft, bright, and almost weightless. That’s whitewashed brick. It’s one of the easiest ways to update an old brick wall without tearing it out or covering it up completely.
The idea is simple. You take white paint, thin it with water, and brush it onto the brick. Then you wipe some of it back off before it dries. What you’re left with is brick that still looks like brick, just lighter and calmer. You can still see the color variations, the texture, and even the mortar lines underneath.
This isn’t a new trend either. People have whitewashed brick and stone for generations, often for practical reasons like brightening dark rooms or covering up soot on old fireplaces. Today it’s mostly about style, but the technique hasn’t changed much at all.
How Whitewashing Actually Works

Whitewash is basically watered-down latex paint. The standard mix combines equal parts flat white latex paint and water, though you can add more water if you want a more transparent, see-through look. Some people tint it with gray or beige instead of straight white for a softer, warmer effect.
The application part is where the technique shows its personality. You brush or dab the mix onto small sections of brick, then wipe some of it away with a rag while it’s still wet. Working in small sections lets you brush it on and then wipe some off for a more natural, see-through finish, and if a section looks too light, you can always add another layer. That back-and-forth is what gives whitewashed brick its handmade, uneven charm.
Before you commit to a whole wall, test a small hidden patch first. Every brick absorbs paint differently depending on its age, porosity, and color. Picking an out-of-the-way spot to test first helps you dial in the mix and confirm how much of the original brick shows through before you start on a wall everyone will see.
One thing worth knowing upfront: whitewash and limewash are not the same thing, even though people mix up the terms constantly.
Whitewash vs Limewash: What’s the Difference

Whitewash is paint-based. Limewash is mineral-based, made from crushed limestone mixed with water. Limewash creates a chalkier finish and naturally seals the surface, which makes it more breathable for older masonry compared to standard whitewash.
That breathability matters more than people expect. Brick, especially older brick, needs to let moisture pass through it. Whitewashing softens brick color while keeping natural character visible, and because whitewash penetrates instead of forming a solid film, the brick can still breathe. Limewash goes even further in this department, which is why a lot of historic home experts lean toward it for older exteriors.
There’s also a look difference. Whitewash tends to give a brighter, more consistent look and works well both indoors and outdoors, while limewash develops a patina over time as it reacts with the environment, giving it more of an aged, old-world feel. Neither one is objectively better. It really comes down to whether you want a crisp, modern brightness or a softer, weathered character.
The Real Benefits of Whitewashed Brick
The biggest draw is obvious the moment you see a before-and-after photo. Dark brick makes rooms feel smaller and heavier. Dark, dated brick often acts as a visual anchor that pulls the energy out of a room, making even large spaces feel cramped and somber. Whitewashing lifts that weight without erasing the material entirely.
Light matters here too. Dark brick absorbs both natural and artificial light, leaving a room feeling heavier than it needs to be. Once you lighten the brick, that same room suddenly reflects more light and feels more open, even if nothing else in the space has changed.
There’s also the character factor. Painting brick solid white hides everything underneath. Whitewashing doesn’t. It enhances the brick’s natural texture and lets you adjust the opacity depending on how much of the original color you want peeking through. You get a fresh look while keeping the story of the material intact.
It’s also a project most people can do themselves. You don’t need special equipment or a contractor for most interior jobs. A brush, a bucket, some rags, and an afternoon are usually enough to transform a fireplace or accent wall.
The Downsides You Should Know Before Starting
Here’s the part people skip over when they’re excited about a Pinterest photo: whitewashing is close to permanent. If you decide later that you miss the original brick color, going back usually requires professional sandblasting, soda blasting, or aggressive chemical strippers. Even after all that work, some white pigment often remains stuck in the deeper grooves of the brick.
That’s why testing first isn’t optional, it’s necessary. Testing a small, inconspicuous area, like a spot behind furniture or inside a closet, is a mandatory step to confirm the final tone before committing to the whole wall. Once you paint the whole fireplace, there’s no easy undo button.
Application itself can get messy too. Whitewash is thin, almost like milk, and it doesn’t stay where you put it. The physics of applying a watery liquid to a vertical surface are inherently messy, since whitewash has a consistency similar to skim milk and drips, splatters, and runs the moment it hits the wall. Cover your floors and furniture generously before you start, even for a small job.
Coverage can also come out uneven, especially for beginners. Whitewash tends to look less uniform than solid paint, and once it’s absorbed into the brick, removing it completely can be difficult. If you want a flawless, even finish, whitewashing might frustrate you. The whole appeal is that it’s a little imperfect.
Exterior brick brings its own set of challenges too. Whitewashing exterior brick can be expensive and time-consuming, and the more advanced techniques, like the German smear method, are difficult enough that many homeowners choose to hire a professional instead. If you’re working on a fireplace or a small interior wall, that’s less of a concern.
Getting Your Brick Ready Before You Start
Prep work makes or breaks this project. Brick collects dust, soot, and grime over the years, and paint won’t stick well to a dirty surface. Cleaning always comes first, no matter which whitewashing method you choose.
There are a few cleaning options depending on how dirty the brick is. Mixing one part dish soap and one part salt with enough water to form a paste, then scrubbing it into the brick and letting it sit for ten minutes before rinsing, works well for moderate grime. For tougher stains, some people turn to a boric acid solution instead, though that’s usually reserved for harder cases.
Once the brick is clean and fully dry, gather your supplies. You’ll want drop cloths for the floor, painter’s tape for clean edges along trim and windows, a bucket for mixing, and a good brush or roller depending on the size of the surface. Old rags are essential too, since you’ll be wiping paint back constantly during application.
Give the brick plenty of time to dry completely before painting. Applying whitewash to damp brick leads to uneven absorption and blotchy results. Patience during prep saves you from redoing the whole project a week later.
Where Whitewashed Brick Works Best
Fireplaces are the most popular spot, and for good reason. A dated brick fireplace can dominate a living room in the worst way, and whitewashing tends to be the single fastest fix. It’s a contained space too, which makes it a manageable first project if you’ve never tried the technique before.
Exterior walls are another common choice, especially on older homes with red or brown brick that feels out of step with a more modern exterior. This is a bigger commitment, both in time and cost, so it’s worth thinking through carefully before diving in. Interior accent walls, exposed brick in kitchens, and even garden walls all take well to the technique too.
Whatever surface you choose, remember that whitewashing rewards patience over speed. Small sections, frequent testing, and a willingness to wipe off too much paint rather than too little will get you the soft, natural look people fall in love with in the first place.


Comments are closed.