
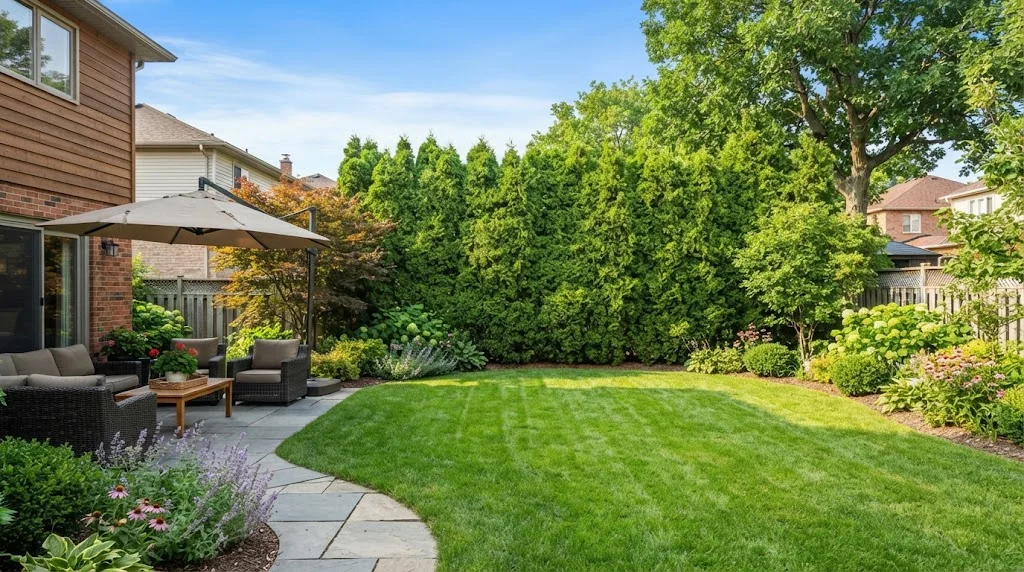
An arborvitae hedge is a row of evergreen Thuja trees planted close together to form a living privacy screen. Popular varieties include Emerald Green and Green Giant. Space plants 2 to 6 feet apart depending on the variety, and give them full sun and well-drained soil for the best results.
If you want privacy without a fence, an arborvitae hedge might be the answer you’re looking for. These evergreen trees stay green all year, grow into a thick wall of foliage, and ask for very little upkeep once they settle in. Homeowners love them because they block noise, hide unsightly views, and add real value to a yard.
But planting one isn’t quite as simple as digging a hole and hoping for the best. Spacing, sunlight, and soil all play a role in how your hedge turns out. Get those details right, and you’ll have a lush green wall in just a few years. Get them wrong, and you might end up with a patchy row of struggling trees.
This guide walks you through everything you need to know about growing an arborvitae hedge, from picking the right variety to keeping it healthy for decades.
What Is an Arborvitae Hedge

Arborvitae, also known as Thuja, is a type of evergreen conifer native to North America and parts of Asia. The name means “tree of life,” and gardeners have relied on it for generations because it holds its color and shape with minimal fuss. Unlike deciduous shrubs, arborvitae never drops its leaves, so your hedge stays green through every season, including winter.
These trees come in a wide range of sizes and shapes. Some grow tall and narrow, perfect for tight side yards. Others spread wide and work well as a thick windbreak. That variety is part of why arborvitae has become one of the most popular hedge plants in the country.
Most gardeners plant arborvitae in a row to build a living fence. Once the trees mature and their branches fill in, the individual plants blend together into a single continuous wall of green. That’s the whole point of a hedge: it looks less like a row of trees and more like a solid, natural barrier.
Popular Arborvitae Varieties for Hedges
Not every arborvitae variety suits every yard, so it helps to know your options before you buy.
Emerald Green is the most common choice for residential hedges. It grows in a narrow, upright form, reaching about 12 to 15 feet tall and only 3 to 4 feet wide at maturity. That slim profile makes it a great fit for smaller lots where space is tight. It also holds its rich green color through winter better than many other varieties.
Green Giant is the pick for homeowners who want fast coverage and don’t mind a bigger tree. It grows quickly, often adding two or three feet a year, and can eventually reach 30 to 50 feet tall if left unpruned. It works well for large properties, windbreaks, or anyone who wants privacy fast and has the space to accommodate it.
American Pillar, sometimes called Full Speed A Hedge, offers another fast-growing option for gardeners who want height without waiting a decade. It fills in quickly and takes up less horizontal space than Green Giant, making it a middle-ground choice.
Your yard size, climate, and how much maintenance you want to do should guide your final decision. A small urban lot calls for a narrower variety like Emerald Green, while a large rural property can handle the size and vigor of Green Giant.
When and Where to Plant Arborvitae
Early spring is the best time to plant arborvitae. The soil has thawed and warmed enough to work with hand tools, and the trees haven’t yet started their main growing push for the year. This timing gives roots a full season to establish before winter arrives.
Fall planting can work too, as long as you give the tree enough time to settle in before the ground freezes. Avoid planting during the peak heat of summer, since new roots struggle to keep up with water loss on hot days.
Choose a site with full sun to partial shade. Arborvitae performs best with at least six hours of direct sunlight a day. In hotter climates, a little afternoon shade helps prevent stress on the foliage. Too much shade, on the other hand, leads to thin, patchy growth, since the tree won’t fill in evenly without enough light.
Soil matters just as much as sunlight. Arborvitae prefers moist, well-drained soil. Heavy clay that holds water can lead to root rot, so amend dense soil with compost before planting if drainage is a concern.
How Far Apart to Plant an Arborvitae Hedge
Spacing is the single biggest factor in how your hedge turns out, and it depends on which variety you choose.
For Emerald Green, plant trees roughly 2 to 3 feet apart for a tight, formal privacy hedge. If you want a slightly looser screen that needs less pruning, space them 3 to 4 feet apart instead. Wider spacing gives each plant more room to breathe, which can mean less disease and steadier growth over time.
Green Giant needs considerably more room because of its size at maturity. Plant these 5 to 8 feet apart for a solid privacy row. If you’re using a staggered double row for extra density or wind protection, space the rows 8 to 10 feet apart with 5 to 8 feet between trees within each row.
If you’re planting near a fence or structure, leave at least 2 to 4 feet between the trunk and the fence line. Planting too close can cause roots to interfere with the foundation later on, and the branches will eventually need extra trimming to stay clear of the structure.
It’s tempting to plant closer together for instant coverage, but resist that urge. Overcrowded trees compete for water and nutrients, which leads to weaker growth, more disease, and thinner hedges within a few years. Wider spacing looks sparse at first, but it pays off with healthier, fuller trees down the road.
Watering and Fertilizing Your Hedge
Newly planted arborvitae needs consistent water to establish strong roots. Water new trees two to three times a week for the first few months, then taper off as the roots settle in. A good rule of thumb for established hedges is about one inch of water per week, adjusted for rainfall and your local climate.
Check soil moisture by feeling a few inches down with your fingers. If it feels dry, add more water. If it feels soggy, cut back, since overwatering can cause root rot just as easily as drought stress can cause browning.
Fertilizing isn’t a heavy lift with arborvitae. Most hedges only need one application a year, applied in early spring before new growth starts. A balanced, slow-release fertilizer works well and supports both root development and healthy green foliage.
Pruning Tips for a Healthy Hedge
The best time to prune arborvitae is late winter to early spring, before new growth appears. Light, regular trimming encourages denser, bushier growth over time, which is exactly what you want in a hedge meant to block a view.
One rule matters more than any other here: never cut into old, bare wood. Arborvitae doesn’t regrow from brown, leafless branches the way some other hedge plants do. Stick to trimming the outer green foliage, and you’ll keep the tree responding well to each cut.
If your hedge has winter damage or browned tips, prune those areas back until you reach healthy green growth. Keep watering as usual afterward and watch for new shoots over the following months. If a branch shows no sign of new growth by midsummer, it’s likely dead and won’t recover.
Common Arborvitae Problems and How to Fix Them
Browning foliage is the most common concern for arborvitae owners, and it usually isn’t as serious as it looks. Inner needles that turn brown and drop in the fall are completely normal, since new outer growth naturally shades and replaces older foliage.
Winter burn is another frequent cause of browning, especially on the side of the hedge facing south or west. Cold wind combined with strong winter sun pulls moisture out of the needles faster than the roots can replace it. Watering deeply through fall and adding mulch around the base can reduce this stress going into winter.
Drought stress shows up as browning tips during hot, dry stretches. Deep, consistent watering usually solves the problem, since shallow watering often fails to reach the deeper roots where the tree actually needs it.
Pests are relatively rare with arborvitae, but spider mites and bagworms occasionally show up. Spider mites leave a dull, stippled look on the foliage and respond well to insecticidal soap. Bagworms create small silken bags on the branches and can be handpicked off in winter before they hatch in spring.
Final Thoughts on Growing an Arborvitae Hedge
An arborvitae hedge rewards a little planning with years of low-maintenance privacy and year-round color. Choose a variety that fits your space, give it room to grow, and stay consistent with water during the first year. After that, your hedge mostly takes care of itself, needing only an annual trim and the occasional check for pests or stress.
Whether you’re screening a busy street, blocking a neighbor’s view, or building a natural windbreak, arborvitae delivers a living wall that keeps working long after the planting is done.

Comments are closed.