
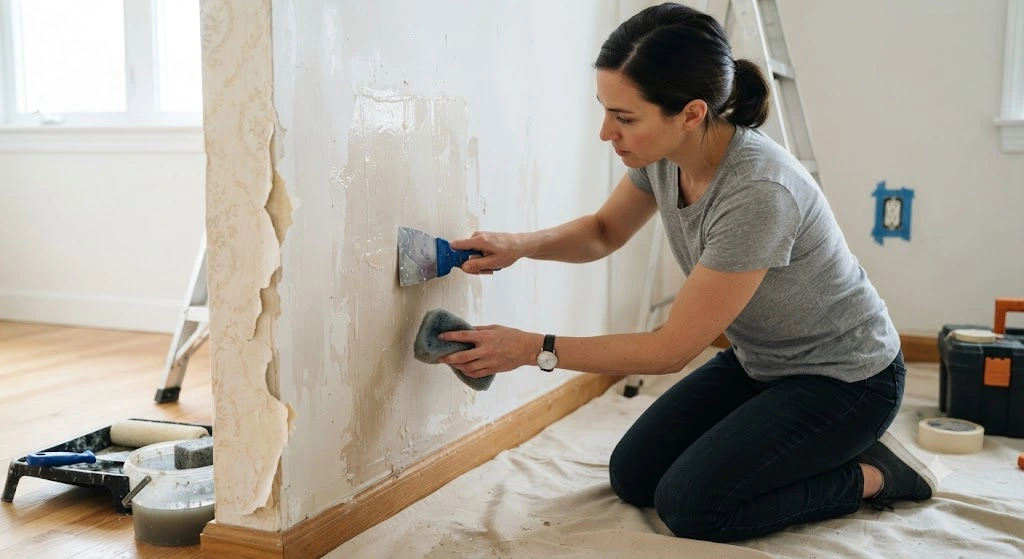
To remove wallpaper glue, mix warm water with dish soap or fabric softener, then apply it to the wall with a sponge or spray bottle. Let it soak for 10-15 minutes, then scrape off the softened glue with a putty knife. Rinse the wall and let it dry fully before painting.
So you finally pulled down that old wallpaper. Good news: the hard part is over. Bad news: your walls are still covered in a sticky, gummy film that won’t come off no matter how hard you rub it.
That leftover glue is called wallpaper paste, and it’s more common than you’d think. Most people don’t realize it’s even there until they run a hand across the wall and feel that rough, tacky texture. The good news is you don’t need fancy tools or expensive products to get rid of it. You just need the right approach and a little patience.
This guide walks you through exactly how to remove wallpaper glue from your walls, step by step, so you can get back to painting or repapering without any lumps, bumps, or sticky surprises.
Why Wallpaper Glue Is So Hard to Remove

Wallpaper paste was built to last. It’s designed to hold heavy paper firmly to a wall for years, sometimes decades, without peeling or bubbling. That’s great when the wallpaper is up. It’s a real headache once you want it gone.
Older homes often have the toughest glue to deal with. Wallpaper hung before the 1980s was frequently applied with wheat paste or a similar starch-based adhesive, and that stuff bonds hard over time. Newer wallpaper often uses a strippable adhesive, which comes off far more easily.
Either way, the glue needs moisture and a little muscle to break down. Skipping this step and painting straight over old paste is a mistake. The paint will bubble, crack, or peel within months because it can’t bond properly to a sticky surface underneath.
What You’ll Need Before You Start
Before you touch a single wall, gather your supplies. Having everything on hand saves you from stopping halfway through with soap in your eyes and a half-scraped wall staring back at you.
You’ll want a bucket, warm water, a sponge or soft scrub brush, and a plastic putty knife. Dish soap, white vinegar, or fabric softener all work well as glue-softening agents, and most people already have one of these in the house. A spray bottle makes it easier to apply your solution evenly, especially on larger walls.
Cover your floors with a drop cloth or old towels, since this job gets messy fast. Wear gloves to protect your hands, and keep a second bucket of clean water nearby for rinsing your sponge as you go. If you’re working in a room with outlets, switch off the power at the breaker before any liquid gets near them.
Step One: Test Your Wall First
Not every wall reacts the same way to moisture and scrubbing. Drywall is more delicate than plaster, and too much water can damage the paper backing if you’re not careful. Before you soak the whole room, test a small hidden patch first, like behind a door or inside a closet.
Apply your cleaning solution to that small section and wait about ten minutes. Check how the wall responds. If the surface stays firm and the glue starts to loosen without the drywall paper bubbling or tearing, you’re good to move forward with the rest of the room.
Step Two: Mix Your Glue-Removal Solution
You don’t need a specialty product to do this job well. A simple mix of warm water and a few drops of dish soap works for most wallpaper paste. For tougher, older glue, try a fifty-fifty mix of white vinegar and hot water instead. The acidity in vinegar helps break down the adhesive faster than soap alone.
Fabric softener is another trick worth trying, especially on stubborn spots. Mix about a quarter cup of fabric softener with a gallon of warm water, then apply it the same way. Whatever solution you choose, the water should be as hot as you can comfortably handle, since heat speeds up the softening process.
If your walls are covered in years of built-up paste, a store-bought wallpaper remover solution can also do the trick. These are formulated specifically to break down adhesive and often work faster than homemade mixes on heavy-duty jobs.
Step Three: Soak the Glue
Apply your solution to the wall using a sponge, sprayer, or paint roller, working in small sections about four feet at a time. Let the solution sit on the surface for about 10 to 15 minutes, keeping the wall damp the whole time. Don’t rush this part. The glue needs time to loosen up, and trying to scrape it too early just means more elbow grease later.
Keep a spray bottle handy to remoisten the wall if it starts drying out before you get to scraping. This step is really about patience more than effort. Let the water and soap do the work for you.
Step Four: Scrape Away the Softened Glue
Once the glue feels soft and slightly slippery to the touch, grab your putty knife and start scraping gently. Hold the blade at a low angle against the wall, and use light, even strokes to lift the paste away. Pressing too hard or holding the knife too steep can gouge the wall, so take it slow.
Work in the same small sections you soaked earlier. As you scrape, wipe the blade clean often so you’re not just smearing wet glue back onto the wall. If a section isn’t coming off easily, stop and reapply your solution rather than forcing it.
Some spots may need two or three rounds of soaking and scraping before the glue fully releases. That’s normal, especially with older or thicker adhesive layers. Stick with it, one section at a time, until the wall feels smooth again.
Step Five: Rinse and Wipe Down the Wall
After scraping, rinse the wall with a clean, damp sponge to remove any leftover soap or glue residue. Change your rinse water often so you’re not just spreading grime around the room. Go over each section a second time to catch spots you might have missed the first pass.
Run your hand across the dry wall once you’re done rinsing. If it still feels rough or tacky in places, that’s a sign there’s still glue left behind. Go back over those areas with your solution and repeat the scraping process until the surface feels clean and smooth.
Step Six: Let the Wall Dry Completely
This step gets skipped more than any other, and it’s the reason so many paint jobs fail. Give your walls at least 24 hours to dry fully before you prime or paint. Open a window or run a fan in the room to speed up air circulation.
Rushing this part traps moisture behind your primer or paint, which leads to bubbling and peeling down the road. Once the wall is bone dry, run your hand over it one more time. A smooth, dry surface means you’re ready for the next step.
Dealing With Stubborn or Old Glue
Some glue just won’t quit, especially in older homes with layers of wallpaper history built up over the decades. If soap and water aren’t cutting it, try a stronger fabric softener mix or a commercial wallpaper remover made for heavy adhesive.
Fine-grit sandpaper can also help smooth out small rough patches once the wall is dry, though you should avoid sanding drywall too aggressively since it damages the paper surface underneath. For truly stubborn spots, a wallpaper steamer loosens even the toughest paste, though it takes more time and a bit more effort to use safely.
Whatever method you choose, don’t paint over glue that still feels sticky or rough. It might look fine at first, but it will cause problems with your paint down the line.
Final Thoughts
Removing wallpaper glue takes patience, but it isn’t complicated once you know the process. Soak, scrape, rinse, and dry, then repeat as needed until your walls feel smooth to the touch. Skipping steps or rushing the drying time is where most people run into trouble.
Take it one section at a time, and don’t be afraid to go over a stubborn spot more than once. A little extra effort now saves you from repainting a bubbled wall a few months from now. Your walls will thank you once they’re finally smooth, clean, and ready for a fresh coat of paint.

Comments are closed.